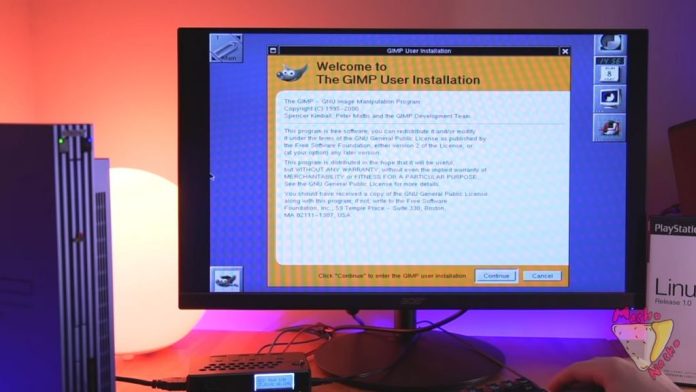
Installing and running Linux on a PlayStation 2 (PS2) may seem like a daunting task, but it can be an exciting project for those interested in both gaming and Linux. In this guide, I will walk you through the necessary steps to get Linux up and running on your PS2, ensuring that you have a smooth experience along the way.
Understanding the PS2 and Linux
Before diving into the installation process, it’s important to understand what we are working with. The PlayStation 2, released in 2000, is a home video game console developed by Sony. Despite being primarily a gaming device, it has a capable hardware architecture that can run a version of the Linux operating system. This opens up possibilities for various applications, development, and even retro gaming.
Prerequisites
Before we begin, let’s gather everything we need for this installation:
- PlayStation 2 Console: Make sure it is a model that supports Linux.
- Linux Distribution: I recommend using Yellow Dog Linux, which was specifically designed for the PS2.
- PS2 Linux Kit: This includes a hard drive, network adapter, and a keyboard.
- USB Drive: To transfer files if necessary.
- Tools: A Phillips screwdriver and a computer with internet access.
Preparing Your PS2
- Open the Console: If you have a PS2 with an internal hard drive, you will need to open the console. Use a Phillips screwdriver to remove the screws on the bottom casing.
- Install the Network Adapter: If your PS2 does not have a network adapter, you will need to install one. This allows you to connect to the internet and download necessary files.
- Connect the Hard Drive: If you have a PS2 Linux Kit, connect the hard drive to the network adapter. Ensure it is securely fastened.
Downloading Yellow Dog Linux
- Visit the Yellow Dog Linux Website: Go to the Yellow Dog Linux Official Site to download the latest version compatible with the PS2.
- Choose the Correct Version: Look for a version that specifically mentions support for the PlayStation 2, as this will ensure compatibility.
- Burn the ISO: Once downloaded, you will need to burn the ISO file to a DVD. Use software like ImgBurn or any other burning tool you prefer.
Installing Linux on PS2
- Insert the DVD: Place the burned Yellow Dog Linux DVD into the PS2.
- Boot the Console: Turn on the PS2. If you have set up everything correctly, the console should boot from the DVD.
- Follow the Installation Wizard: Yellow Dog Linux will guide you through the installation process. Follow the prompts to install Linux onto your hard drive.
- Partition the Hard Drive: During the installation process, you may be asked to partition the hard drive. It is advisable to allow the installer to partition it automatically unless you have specific requirements.
- Complete the Installation: After the installation is complete, the system will prompt you to remove the DVD and restart the console.
Configuring Linux
- Booting into Linux: Once your PS2 restarts, it should boot into the Linux operating system.
- Initial Setup: You will be prompted to set up your user account and configure basic settings such as language, time zone, and network connection.
- Update the System: It’s important to ensure that your Linux installation is up to date. Use the terminal to run the command
sudo yum updateto fetch the latest updates. - Install Additional Software: Depending on your needs, you may want to install additional software. You can use package managers like
yumoraptto find and install applications easily.
Running Applications
Once Linux is installed and configured, you can begin to explore and run applications.
- Development Environment: Linux on your PS2 can serve as a lightweight development environment. Consider installing programming languages such as Python or C++.
- Retro Gaming: You can run emulators to play classic games. Look for suitable emulators for your favorite consoles and install them.
- Media Center: With the right software, your PS2 can also serve as a media center for streaming or playing music and videos.
Troubleshooting Common Issues
- Boot Failure: If your PS2 fails to boot into Linux, ensure the DVD is burned correctly and that the hard drive is properly connected.
- Network Issues: If you encounter problems with your network connection, check your settings and ensure that the network adapter is functioning.
- Performance Issues: Running Linux on PS2 may not be as fast as on a modern computer. Keep your applications lightweight and consider using a minimal desktop environment.
Conclusion
Installing and running Linux on a PlayStation 2 can be an enjoyable and educational experience. It allows you to explore the capabilities of your console beyond gaming. Whether you’re looking to develop software, play retro games, or simply learn more about Linux, the PS2 can serve as a unique platform for your projects.
If you encounter any challenges along the way, don’t hesitate to seek help from online forums and communities dedicated to Linux and gaming.
By following this guide, I hope you find success in your journey to run Linux on your PS2 with a modern custom internal SSD. Happy computing!
<iframe width="560" height="315" src="https://www.youtube.com/embed/slbnDYFL99g?si=0uAxEUCBMMUvSMb8" title="YouTube video player" frameborder="0" allow="accelerometer; autoplay; clipboard-write; encrypted-media; gyroscope; picture-in-picture; web-share" referrerpolicy="strict-origin-when-cross-origin" allowfullscreen></iframe>


.jpg?w=100&resize=100,70&ssl=1)
